什么是 Koa2
由 Express 原班人马打造的新生代 Node.js Web 框架,它的代码很简单,没有像 Express 那样,提供路由、静态服务等等,它是为了解决 Node 问题(简化了 Node 中操作)并取代之,它本身是一个简单的中间件框架,需要配合各个中间件才能使用
文档
中文文档 (野生)
最简单的 Koa 服务器
1
2
3
4
5
6
7
8
9
10
11
| const Koa = require('koa');
const app = new Koa();
app.use((ctx) => {
ctx.body = 'Hello World';
});
app.listen(3000, () => {
console.log('3000端口已启动');
});
|
洋葱模型
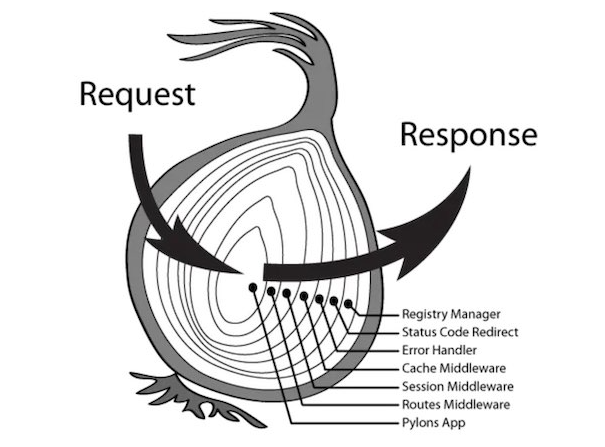
这是 Koa 的洋葱模型
看看 Express 的中间件是什么样的:

请求(Request)直接依次贯穿各个中间件,最后通过请求处理函数返回响应(Response)。再来看看 Koa 的中间件是什么样的:
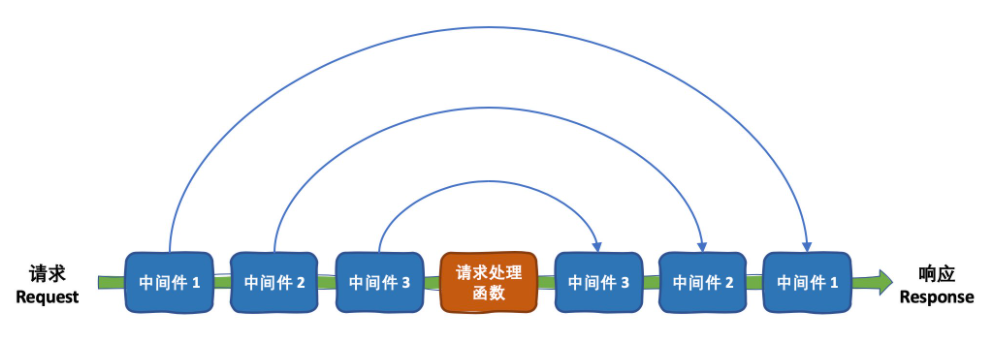
可以看出,Koa 中间件不像 Express 中间件那样在请求通过了之后就完成自己的使命;相反,中间件的执行清晰地分为两个阶段。我们看看 Koa 中间件具体是什么样的
Koa 中间件的定义
Koa 的中间件是这样一个函数:
1
2
3
4
5
| async function middleware(ctx, next) {
await next();
}
|
第一个参数是 Koa Context,也就是上图中贯穿中间件和请求处理函数的绿色箭头所传递的内容,里面封装了请求体和响应体(实际上还有其他属性),分别可以通过 ctx.request 和 ctx.response 来获取,以下是一些常用的属性:
1
2
3
| ctx.url;
ctx.body;
ctx.status;
|
更多 Context 属性请参考 Context API 文档
中间件的第二个参数便是 next 函数:用来把控制权转交给下一个中间件。但它与 Express 的 next 函数本质的区别在于, Koa 的 next 函数返回的是一个 Promise ,在这个 Promise 进入完成状态(Fulfilled)后,就会去执行中间件中第二个阶段的代码。
有哪些常见的中间件
路由中间件——koa-router 或@koa/router
下载 npm 包
1
| npm install koa-router --save
|
有些教程使用 @koa/router,现如今这两个库由同一个人维护,代码也一致。即 koa-router === @koa/router(写自 2021 年 8 月 23 日)
NPM 包地址:koa-router 、@koa/router
如何使用
在根目录下创建 controllers 目录,用来存放控制器有关的代码。首先是 HomeController,创建 controllers/home.js,代码如下:
1
2
3
4
5
6
7
8
9
10
11
12
13
| class HomeController {
static home(ctx) {
ctx.body = 'hello world';
}
static async login(ctx) {
ctx.body = 'Login Controller';
}
static async register(ctx) {
ctx.body = 'Register Controller';
}
}
module.exports = HomeController;
|
实现路由
再创建 routes 文件夹,用于把控制器挂载到对应的路由上面,创建 home.js
1
2
3
4
5
6
7
8
9
10
| const Router = require('koa-router');
const { home, login, register } = require('../controllers/home');
const router = new Router();
router.get('/', home);
router.post('/login', login);
router.post('/register', register);
module.exports = router;
|
注册路由
在 routes 中创建 index.js,以后所有的路由都放入 routes,我们创建 index.js 的目的是为了让结构更加整齐,index.js 负责所有路由的注册,它的兄弟文件负责各自的路由
1
2
3
4
5
6
7
8
9
10
| const fs = require('fs');
module.exports = (app) => {
fs.readdirSync(__dirname).forEach((file) => {
if (file === 'index.js') {
return;
}
const route = require(`./${file}`);
app.use(route.routes()).use(route.allowedMethods());
});
};
|
注:allowedMethods 的作用
- 响应 option 方法,告诉它所支持的请求方法
- 相应地返回 405 (不允许)和 501 (没实现)
注:可以看到 @koa/router 的使用方式基本上与 Express Router 保持一致
引入路由
最后我们需要将 router 注册为中间件,新建 index.js,编写代码如下:
1
2
3
4
5
6
7
8
9
10
11
12
| const Koa = require('koa')
const routing = require('./routes')
consr app = new Koa()
routing(app)
app.listen(3000);
|
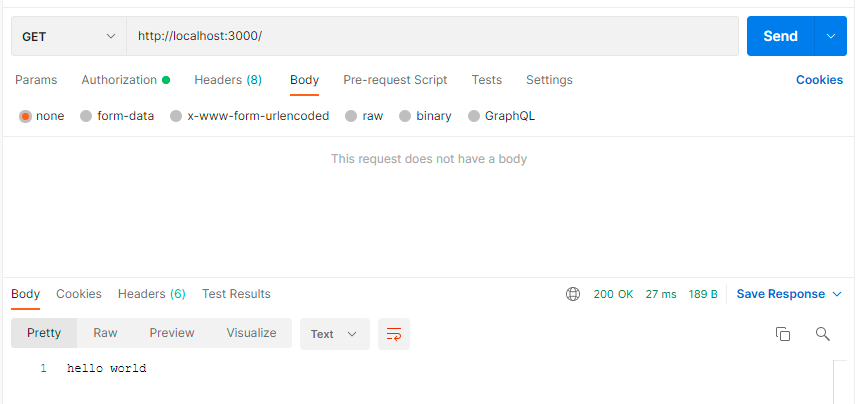
使用 postman 测试一下
其他中间件
- koa-bodyparser ——请求体解析
- koa-static —— 提供静态资源服务
- @koa/cors —— 跨域
- koa-json-error —— 处理错误
- koa-parameter —— 参数校验
1
2
3
4
5
| cnpm i koa-bodyparser -S
cnpm i koa-static -S
cnpm i @koa/cors -S
cnpm i koa-json-error -S
cnpm i koa-parameter -S
|
1
2
3
4
5
6
7
8
9
10
11
12
13
14
15
16
17
18
19
20
21
22
23
24
25
26
| const path = require('path');
const Koa = require('koa');
const bobyParser = require('koa-bodyparser');
const koaStatic = require('koa-static');
const cors = require('@koa/cors');
const error = require('koa-json-error');
const parameter = require('koa-parameter');
const routing = require('./routes');
const app = new Koa();
app.use(
error({
postFormat: (e, { stack, ...rest }) =>
process.env.NODE_ENV === 'production' ? rest : { stack, ...rest },
}),
);
app.use(bobyParser());
app.use(koaStatic(path.join(__dirname, 'public')));
app.use(cors());
app.use(parameter(app));
routing(app);
app.listen(3000, () => {
console.log('3000端口已启动');
});
|
实现 JWT 鉴权
JSON Web Token(JWT)是一种流行的 RESTful API 鉴权方案
先安装相关的 npm 包
1
| cnpm install koa-jwt jsonwebtoken -S
|
创建 config/index.js ,用来存放 JWT Secret 常量,代码如下:
1
2
3
4
5
| const JWT_SECRET = 'secret';
module.exports = {
JWT_SECRET,
};
|
有些路由我们希望只有已登录的用户才有权查看(受保护路由),而另一些路由则是所有请求都可以访问(不受保护的路由)。在 Koa 的洋葱模型中,我们可以这样实现:
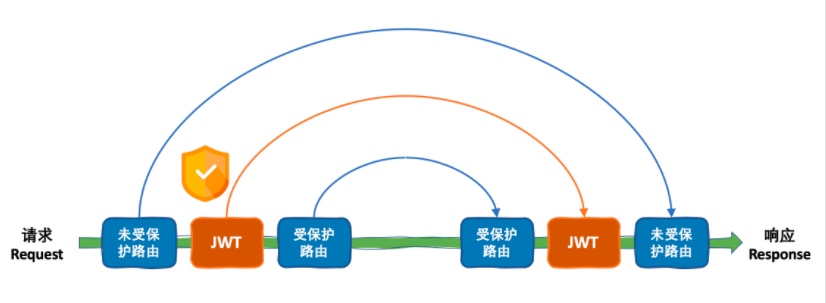
可以看出,所有的请求都可以直接访问未受保护的路由,但是受保护的路由都放在 JWT 中间件的后面,我们需要再创建几个文件来做 JWT 的实验
我们知道,所谓的用户(users)是个最常见的需要鉴权的路由,所以我们现在 controllers 中创建 user.js ,写下如下代码:
1
2
3
4
5
6
7
8
9
10
11
12
13
14
15
16
17
18
19
20
21
22
23
24
| class UserController {
static async create(ctx) {
ctx.status = 200;
ctx.body = 'create';
}
static async find(ctx) {
ctx.status = 200;
ctx.body = 'find';
}
static async findById(ctx) {
ctx.status = 200;
ctx.body = 'findById';
}
static async update(ctx) {
ctx.status = 200;
ctx.body = 'update';
}
static async delete(ctx) {
ctx.status = 200;
ctx.body = 'delete';
}
}
module.exports = UserController;
|
注册 JWT 中间件
用户的增删改查都安排上了,语义很明显了,其次我们在 routes 文件中创建 user.js,这里展示与 users 路由相关的代码:
1
2
3
4
5
6
7
8
9
10
11
12
13
14
15
16
17
18
19
20
21
22
| const Router = require('koa-router');
const jwt = require('koa-jwt');
const {
create,
find,
findById,
update,
delete: del,
} = require('../controllers/user');
const router = new Router({ prefix: '/users' });
const { JWT_SECRET } = require('../config/');
const auth = jwt({ JWT_SECRET });
router.post('/', create);
router.get('/', find);
router.get('/:id', findById);
router.put('/:id', auth, update);
router.delete('/:id', auth, del);
module.exports = router;
|
综上代码,routes 文件下的 home.js 都不需要 JWT 中间件的保护,user.js 中的 更新和删除需要 JWT 的保护
测试一下,能看出 JWT 已经起作用了
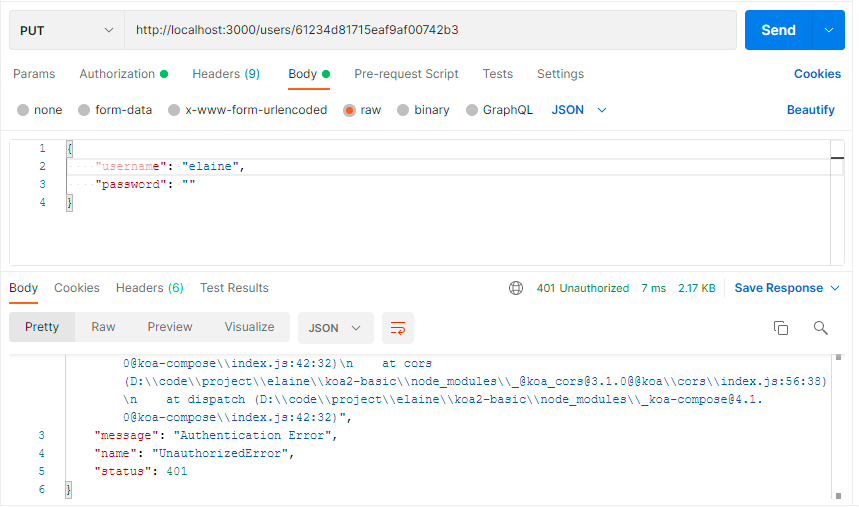
我们到目前为止,完成了对 JWT 的验证,但是验证的前提是先签发 JWT,怎么签发,你登录的时候我给你一个签好名的 token,要更新/删除时在请求头中带上 token,我就能校验…
这里牵扯到登录,我们先暂停一下,先补充数据库的知识,让项目更加完整
Mongoose 加入战场
如果要做一个完整的项目,数据库是必不可少的,与 Node 匹配的较好的是 NoSql 数据库,其中以 Mongodb 为代表,当然如果我们要使用这一数据库,需要按照相应的库,而这个库就是 mongoose
下载 mongoose
连接及配置
在 config/index.js 中添加 connectionStr 变量,代表 mongoose 连接的数据库地址
1
2
3
4
5
6
7
| const JWT_SECRET = 'secret';
const connectionStr = 'mongodb://127.0.0.1:27017/basic';
module.exports = {
JWT_SECRET,
connectionStr,
};
|
创建 db/index.js
1
2
3
4
5
6
7
8
9
10
11
12
13
14
15
16
17
18
19
| const mongoose = require('mongoose');
const { connectionStr } = require('../config/');
module.exports = {
connect: () => {
mongoose.connect(connectionStr, {
useNewUrlParser: true,
useUnifiedTopology: true,
});
mongoose.connection.on('error', (err) => {
console.log(err);
});
mongoose.connection.on('open', () => {
console.log('Mongoose连接成功');
});
},
};
|
进入主文件 index.js,修改配置并启动
1
2
3
4
5
| ...
const db = require('./db/')
...
db.connect()
|
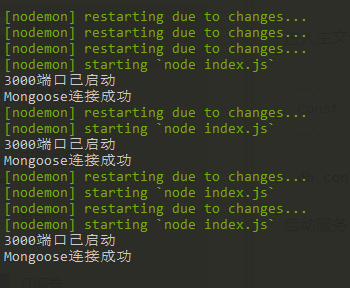
启动服务 npm run serve,即 nodemon index.js,能看出 mongoose 已经连接成功了
创建数据模型定义
在根目录下创建 models 目录,用来存放数据模型定义文件,在其中创建 User.js,代表用户模型,代码如下:
1
2
3
4
5
6
7
8
| const mongoose = require('mongoose');
const schema = new mongoose.Schema({
username: { type: String },
password: { type: String },
});
module.exports = mongoose.model('User', schema);
|
具体可以看看 Mongoose 这篇文章,这里我们就看行为,以上代码表示建立了一个数据对象,供操作器来操作数据库
在 Controller 中操作数据库
然后就可以在 Controller 中进行数据的增删改查操作。首先我们打开 constrollers/user.js
1
2
3
4
5
6
7
8
9
10
11
12
13
14
15
16
17
18
19
20
21
22
23
24
25
26
27
28
29
30
31
| const User = require('../models/User');
class UserController {
static async create(ctx) {
const { username, password } = ctx.request.body;
const model = await User.create({ username, password });
ctx.status = 200;
ctx.body = model;
}
static async find(ctx) {
const model = await User.find();
ctx.status = 200;
ctx.body = model;
}
static async findById(ctx) {
const model = await User.findById(ctx.params.id);
ctx.status = 200;
ctx.body = model;
}
static async update(ctx) {
const model = await User.findByIdAndUpdate(ctx.params.id, ctx.request.body);
ctx.status = 200;
ctx.body = model;
}
static async delete(ctx) {
await User.findByIdAndDelete(ctx.params.id);
ctx.status = 204;
}
}
module.exports = UserController;
|
以上代码中,
- User.create({xxx}):在 User 表中创建一个数据
- User.find():查看所有的 User 表中的数据
- User.findById(id):查看 User 表中的其中一个
- User.findByIdAndUpdate(id, body):更新 User 表中的其中一个数据
- User.findByIdAndDelete(id):删除 User 表中的其中一个数据
以上就是对数据库的增删改查
加盐
这个我们需要对密码进行一下加密,无它,安全。
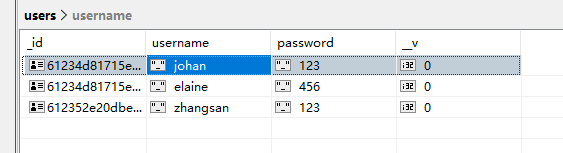
进数据库一查,就能看到密码,这说明数据对开发人员是公开的,开发人员可以拿着用户的账号密码做任何事,这是不被允许的
下载 npm 包——bcrypt
我们前往 models/User.js 中,对其进行改造
1
2
3
4
5
6
7
8
9
10
11
12
| ...
const schema = new mongoose.Schema({
username: { type: String },
password: {
type: String,
select: false,
set(val) {
return require('bcrypt').hashSync(val, 10)
},
},
})
...
|
添加 select:false 不可见,set(val) 对值进行加密,我们来测试一下
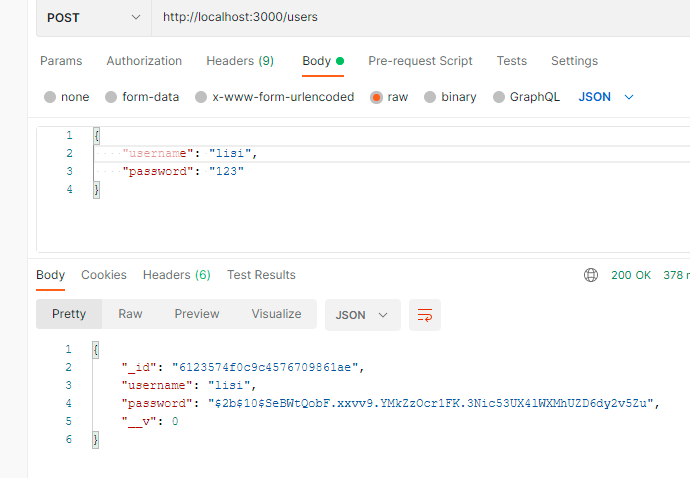
能看到 password 被加密了,即使在数据库里,也看不出用户的密码,那用户输入的密码难道输入这么一串密码,显然不是,用户要是输入的话,我们要对其进行验证,例如我们的登录
我们进入 constrollers/home 文件中,对其进行改造,
1
2
3
4
5
6
7
8
9
10
11
| ...
class HomeController {
static async login(ctx) {
const { username, password } = ctx.request.body
const user = await User.findOne({ username }).select('+password')
const isValid = require('bcrypt').compareSync(password, user.password)
ctx.status = 200
ctx.body = isValid
}
...
}
|
- User.findOne({ username }) 能查到到没有 password 的数据,因为我们人为的把 select 设为 false,如果要看,加上 select(‘+password’) 即可
- require(‘bcrypt’).compareSync(password, user.password) 将用户输入的明文密码和数据库中的加密密码进行验证,为 true 是正确,false 为密码不正确
回到 JWT
在 Login 中签发 JWT Token
我们需要提供一个 API 端口让用户可以获取到 JWT Token,最合适的当然是登录接口 /login ,打开 controllers/home.js,在 login 控制器中实现签发 JWT Token 的逻辑,代码如下:
1
2
3
4
5
6
7
8
9
10
11
12
13
14
15
16
17
18
19
20
21
22
23
24
25
26
27
28
| const jwt = require('jsonwebtoken')
const User = require('../models/User')
const { JWT_SECRET } = require('../config/')
class HomeController {
static async login(ctx) {
const { username, password } = ctx.request.body
const user = await User.findOne({ username }).select('+password')
if (!user) {
ctx.status = 422
ctx.body = { message: '用户名不存在' }
}
const isValid = require('bcrypt').compareSync(password, user.password)
if (isValid) {
const token = jwt.sign({ id: user._id }, JWT_SECRET)
ctx.status = 200
ctx.body = token
} else {
ctx.status = 401
ctx.body = { message: '密码错误' }
}
}
...
}
|
在 login 中,我们首先根据用户名(请求体中的 name 字段)查询对应的用户,如果该用户不存在,则直接返回 401;存在的话再通过 (bcrypt').compareSync 来验证请求体中的明文密码 password 是否和数据库中存储的加密密码是否一致,如果一致则通过 jwt.sign 签发 Token,如果不一致则还是返回 401。
在 User 控制器中添加访问控制
Token 的中间件和签发都搞定之后,最后一步就是在合适的地方校验用户的 Token,确认其是否有足够的权限。最典型的场景便是,在更新或删除用户时,我们要确保是用户本人在操作。打开 controllers/user.js
1
2
3
4
5
6
7
8
9
10
11
12
13
14
15
16
17
18
19
20
21
22
23
24
25
26
27
28
29
30
31
32
| const User = require('../models/User')
class UserController {
...
static async update(ctx) {
const userId = ctx.params.id
if (userId !== ctx.state.user.id) {
ctx.status = 403
ctx.body = {
message: '无权进行此操作',
}
return
}
const model = await User.findByIdAndUpdate(ctx.params.id, ctx.request.body)
ctx.status = 200
ctx.body = model
}
static async delete(ctx) {
const userId = ctx.params.id
if (userId !== ctx.state.user.id) {
ctx.status = 403
ctx.body = { message: '无权进行此操作' }
return
}
await User.findByIdAndDelete(ctx.params.id)
ctx.status = 204
}
}
module.exports = UserController
|
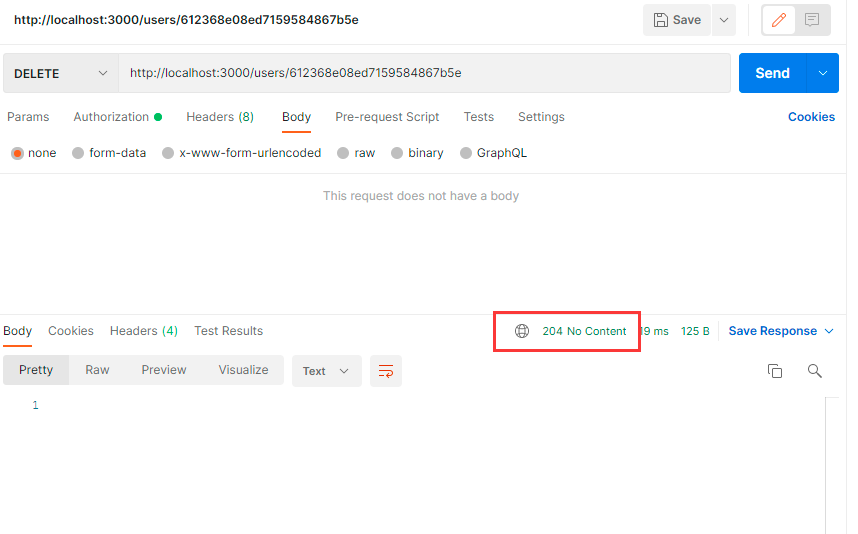
添加了一些用户并登录,将 Token 添加到请求头中,使用 DELETE 删除用户,能看到 状态码变成 204,删除成功
断言处理
在做登录时、更新用户信息、删除用户时,我们需要 if else 来判断,这看起来很蠢,如果我们能用断言来处理,代码在看上去会优雅很多,这个时候 http-assert 就出来了
1
2
3
4
5
6
7
8
9
10
11
12
13
14
15
16
17
18
19
20
21
22
23
|
...
const assert = require('http-assert')
class HomeController {
static async login(ctx) {
const { username, password } = ctx.request.body
const user = await User.findOne({ username }).select('+password')
assert(user, 422, '用户不存在')
const isValid = require('bcrypt').compareSync(password, user.password)
assert(isValid, 422, '密码错误')
const token = jwt.sign({ id: user._id }, JWT_SECRET)
ctx.body = { token }
}
...
}
|
同理,处理 controllers/user
1
2
3
4
5
6
7
8
9
10
11
12
13
14
15
| ...
static async update(ctx) {
const userId = ctx.params.id
assert(userId === ctx.state.user.id, 403, '无权进行此操作')
const model = await User.findByIdAndUpdate(ctx.params.id, ctx.request.body)
ctx.status = 200
ctx.body = model
}
static async delete(ctx) {
const userId = ctx.params.id
assert(userId === ctx.state.user.id, 403, '无权进行此操作')
await User.findByIdAndDelete(ctx.params.id)
ctx.status = 204
}
...
|
代码看起来就是整洁清爽
参数校验
之前我们加了一个中间件——koa-parameter,我们当初只是注册了这个中间件,但是未使用,我们在创建用户时需要判断用户名和密码的数据类型为 String 类型且必填,进入 controllers/user.js 添加代码如下:
1
2
3
4
5
6
7
8
9
10
11
12
13
14
| ...
class UserController {
static async createUser(ctx) {
ctx.verifyParams({
username: { type: 'string', required: true },
password: { type: 'string', required: true },
})
const { username, password } = ctx.request.body
const model = await User.create({ username, password })
ctx.status = 200
ctx.body = model
}
...
}
|
Github 地址:koa-basic
参考资料
一杯茶的时间,上手 Koa2 + MySQL 开发